Showing posts with label Cookbook. Show all posts

Monday, September 15, 2014

Our Family's Potato Salad

How can it be 4 months since we posted last?  It's been summer in Montana, that's how.  We've been outside!!  We've been fishing, hiking, porch-dwelling, BBQing, and making our Black Bean and Corn Salsa (recipe coming soon), mastering Potato Salad, and making our version of Chinese Cole Slaw many times over!  So now that the weather is turning cooler, I don't mind being inside at the computer.

Let's talk about potato salad.  This has been a mystery to me.  What kind of potato?  Miracle Whip or Mayo?  Mustard or not? (Nicole would say NOT)  Potato to Egg ratio?  Pickles or Celery, or both?  And through all of this, I will know it when I taste it.  My family has THE BEST potato salad.  My cousin, Angie, is expected to bring it to every family get together.  Nicole says to me, "Just look for 'best potato salad' on Pinterest."  I said, "I don't want the best potato salad recipe - I want our family's recipe."  HAHAHA

A lot of our Dad's side of the family came to visit for Memorial Day weekend and it led to many conversations with our Aunt Pam about the family potato salad.  I told her that I needed to call our cousin, Angie, since she couldn't make it to visit, to get her "recipe" (which I knew didn't exist because she just knows how to make it) and Aunt Pam said, "I can tell you how to make it".  Here's what I wrote down:
  • Peel and boil 5 russet potatoes until just done - dice
  • 6 hard boiled eggs - peel and dice
  • Celery is optional, Angie doesn't use, Aunt Pam does
  • Mix these three together
  • In a separate bowl, mix: 
    • 4-5 tbsp Miracle Whip
    • 1 tbsp Yellow Mustard
    • sprinkle onion salt
    • sprinkle celery salt
    • salt and pepper to taste
    • splash apple cider 
  • Taste - if you need, you might need to add a touch of sugar.  If your sauce tastes good, your salad will, too.
  • Pour over egg/potato mixture and sprinkle paprika on top.
Well, that answers so many questions.  HOORAY!

So, my inaugural attempt gave me the amounts and ratios - because potatoes around here can be the size of my fist or the size of my face.  And I only had onion powder, but adding a smidge more salt should have done the trick, and it needed the sprinkle of sugar.  But, even though my sauce tasted good before I poured it, my potato salad tasted like raw potato and hard-boiled eggs.  It was soooo bland. I called Aunt Pam because how much is a "sprinkle" to her?  A teaspoon?  A tablespoon?  

And throughout this, we just laugh at my many examples of "There is no recipe, I just know what it tastes like" debacles.  And don't get me started about my "special" crocheted wash rags.

Enter a visit from our mother!  Wait!  I'll bet she knows how to make it.  "Hey mom - will you see if you have a recipe for Grandma's potato salad?"   She had one, but it was ingredients only, no amounts.  Great.  I already have the ingredients (they matched what Aunt Pam said).  So during her visit, she gave it a try - while I insisted she measure and write down every single thing she put in the bowl.  And voilà.  THE potato salad.  And yep...I knew it when I tasted it.  But I now have the recipe:

Potato Salad

5 red or russet* potatoes-the size of your fist
5  eggs
2-3 celery stalks, diced (optional)
1/4 c Miracle Whip (not fat free kind)
2 tsp yellow mustard
1/2 - 1 tsp apple cider vinegar
2-3 tbsp sugar
1/2 tsp each of salt, pepper, and celery salt, onion powder
1/4 tsp paprika, for pretty looks
  • Peel and halve potatoes. In a medium-sized sauce pan, boil the potatoes covered in water on high until just fork tender (you want them to be a little firm so they keep their shape when diced).  Drain.
  • Place eggs in a medium sauce pan and cover with cold water until at least an inch over the top of the eggs. 
  • On high heat, bring eggs to a boil.  Once rolling boil, reduce to medium heat and let them simmer for 10 minutes.  
  • Once timer goes off, remove from heat, rinse under cold water to stop the cooking process.
  • The potatoes should be cool enough to dice.  After diced, put in large bowl.
  • Peel and dice eggs, add to potatoes.
  • If adding celery, dice and add to potatoes and eggs.
  • In separate bowl, mix the remaining ingredients except the paprika, until well incorporated.
  • Pour over potatoes and eggs.  Mix gently.
  • Sprinkle paprika over salad.
  • Refrigerate until serving.
This is really great left over so I put into single serving containers for my lunches for work.  


*when our mom was here, I only had red potatoes.  I've used both kinds and can't really tell a difference in taste or texture.  But since I've only used the two kinds, that's all I can recommend.

Update Aug 2020:  I only had celery seed on hand. Added a smidge more salt to accommodate celery salt. Also, I forgot the sugar and it turned out great. So that is clearly optional. LOL!  If too salty, just add a little more miracle whip and mustard. 

Monday, May 5, 2014

Spicy Dill Pickles

Our dad calls these "Delayed Atomic Reaction" pickles.  I swear they aren't THAT spicy.  And yes, this is coming from someone who loves ghost pepper flakes.  But I think the jars he got had extra potent peppers.  Either that or he ate the pepper thinking it was a pickle.  LOL  We've laughed about these pickles for years now.

Don't let that scare you away.  The level of spice can be adjusted to your taste.

In the summer of 2011, my dear friend Sandy Hanson shared a jar of her spicy pickles.  I am NOT kidding... they were the best tasting pickles I have ever had.  I just had to learn how to make them.  That fall, she taught me how to can with this recipe.  I didn't even know I wanted to learn how to can  And now I've canned a LOT.  It's a precious gift, Sandy, and I will be forever grateful!

Spicy Dill Pickles

This recipe yields 14 quart jars.

In pot #1, boil the lids and rings for your jars.

In pot #2, (a large stock pot), boil water- this is for the canning process.

In pot # 3, boil the following ingredients:
3 qt water
3 qt white vinegar
1.5 c pickling salt
In each clean, sterilized quart jar add the following ingredients.  You'll need to multiply the following amounts by 14.  Add the spices first, then dill weed, then peppers, and cucumbers last:
2 tsp mustard seeds
2 tsp minced garlic
1/8 tsp celery seed
1/8 tsp dill seed
1/8 tsp red pepper flakes
1/8 tsp black pepper corns
1/4 tsp pickle crisp granules
1 sprig fresh dill weed
1 Habanero pepper, sliced in half (omit for medium and mild spiced pickles)
1 Serrano pepper, sliced in half (omit for mild flavored pickles)
5-7 small cucumbers
Pour liquid into jar over cucumbers until just below the neck.  Put lid on and then the ring (just finger tight, leave the rings kind of loose).  Boil jars completely submerged in water for 10 minutes.  Remove from the water, set aside and cool (and the best part...listen for the POP!)  Once boiled and sealed, you can tighten rings. If they don't seal, you can turn them upside down.  If they still don't seal, keep in the refrigerator.  They will keep for a few weeks.  When Sandy and I made these, we made 6 dozen, and only one didn't seal.

And this is the worst step.  These pickles will be ready after a month.  The waiting is a killer.  After that, they will keep for years.  Though I doubt they will last that long.


Laura & Sandy


Sunday, March 23, 2014

Basic Rice & Quinoa Recipes

Lately we've been eating a lot of rice and quinoa recipes.  Here are basic recipes:

Wild Rice

1 part rice (#1271 at the Good Food Store in Missoula, Montana, USA)
2 parts water

Bring water to a boil in a medium saucepan, add rice, simmer on medium heat - covered - for about 45 minutes.

Brown Rice

1 part rice
1 part water
1 part chicken or vegetable broth

 Bring water to a boil in a medium saucepan, add rice, simmer on medium heat - covered - for about 45 minutes.

Black Rice

1 part rice (#1272 at the Good Food Store in Missoula, Montana, USA)
3 parts water

Bring water to a boil in a medium saucepan, add rice, simmer on medium heat - covered - for about 40 minutes.

Quinoa

1 part quinoa
1 part water
1 part chicken or vegetable stock

Bring water and stock to a boil in a medium saucepan, add rice, simmer on medium heat - covered - for 20-25 minutes.

Monday, March 17, 2014

Sticky Buns

Okay.  We've been holding onto this one.  But in the spirit of "almost" spring and a few more cold mornings in our future, we thought we'd share.  Enjoy while being snuggled on the couch under your favorite afghan.  


Sticky Buns


1 bag frozen Rhodes rolls
Crisco, for greasing the pan and rolls
1/4 c cinnamon
1 box of butterscotch pudding
1/2 c (1 stick) unsalted butter
1/2 c brown sugar

  1. Grease bundt pan with crisco.  Grease top of each frozen roll before putting in pan. Place 22-24 rolls evenly in pan.
  2. Sprinkle rolls evenly with cinnamon.
  3. Sprinkle rolls evenly with 1/2 of the butterscotch pudding packet.
  4. In small saucepan, melt butter and brown sugar together. Use low/med heat stirring constantly. It takes awhile to turn into a creamy caramel where the butter and sugar are completely combined, but as with many of our lessons, low and slow!
  5. Pour mix over rolls evenly.
  6. Cover with light towel and let rise overnight.
  7. Bake at 350 for 30 minutes (check at 20).
  8. Put a cookie sheet on the rack below in case it oozes caramel.
  9. Might need to lower the rack... Depending on how tall they rose... Don't want to burn the top.
  10. They're done when the tops are a dark, golden brown.
  11. Invert onto large plate.


Smoked Goose

Don't be scared.  We use this in place of the "pork" in "pork and seeds".  OMG  It's amazingly delicious!!

Smoked Goose

2-3 goose breasts, rinsed
1/4 c brown sugar
1/4 c salt
1 c soy sauce
1 tsp onion powder
2 tbsp minced onion
1/2 c sherry or dry red wine
2 tbsp grated fresh ginger or 1 tsp ground ginger
1/2 c orange juice
1 1/2 c water
Hot Chinese Mustard
Sesame Seeds
  1. Place goose breasts in large zip top bag.
  2. In large bowl, mix all remaining ingredients well, except mustard and seeds.
  3. Pour over goose breasts into zip top bag.
  4. Seal bag and place flat onto a large plate (in case the zip top bag leaks).
  5. Refrigerate overnight, at least 8 hours...up to 24 hours.
  6. Remove goose from bag and rinse.
  7. Dry with paper towels until completely dry.
  8. Place in smoker for 2.5 - 3 hours.
  9. Finish cooking in oven at 300 degrees for one hour.
  10. Slice into bite sized pieces and serve with hot mustard and sesame seeds.
Courtesy of the internet.  I can not find the picture I took this Christmas!  But ours looked just like this.  Must organize photos! :)


Monday, February 24, 2014

Enchiladas

Only the best enchiladas I've ever had.  And I don't normally like enchiladas.  Thanks to my friend, KayCee Hall, for the inspiration and 95% of the recipe.

Enchiladas


1 lb ground beef
1.5 tbsp taco seasoning (I used Fiesta Dip from Tastefully Simple)
1-4 oz  can diced green chiles
1-15 oz can black beans, drained and rinsed
3 green onion stalks, diced
1-4 oz small can chopped olives, drained
Burrito shells
1 lb Mozzarella Cheese, shredded
1 lb Mexican Cheese, shredded
1-10 oz can Old El Paso Mild Enchilada Sauce
1-10 oz can Old El Paso Medium Enchilada Sauce
  1. Preheat oven to 325 degrees.
  2. In a separate bowl, mix both enchilada sauces together.
  3. In medium skillet, brown ground beef, drain and return to pan.
  4. Add taco seasoning and stir well.
  5. Off the burner add diced green chillies, black beans, chopped green onions and olives.
  6. Divide filling between 5-6 burrito sized shells, put a handful of shredded mozzarella in each and roll up. You can also use small shells which fits more into the pan. 
  7. Place in GREASED 9 x 13" pan, pour mixed enchilada sauce over burritos.
  8. Top with shredded Mexican cheese. 
  9. Cover with foil and bake at 350 degrees (325 degrees if using a glass pan for 30 min. 
  10. Remove foil and bake for 10 more minutes.
You can make ahead and put in fridge.  When baking, add another 15-20 min baking time. 

Top with sour cream when serving, optional.

And these are amazing left over so next time, I will make a double batch!!


p.s.  I had some meat mixture left over.  It was amazing in taco salads.

USANA Nutrimeal Chia Seed Pudding

We're always looking for ways to incorporate our USANA products into healthy recipes. And this?  Accidentally delicious and SUPER healthy!! There are a ton of chia seed pudding recipes online. I combined a few of them and voila!

USANA Nutrimeal Chia Seed Pudding

1/2 c chocolate almond milk
1/4 c unsweetened almond milk
1 tbsp cocoa powder
1 tbsp USANA Dutch Chocolate Nutrimeal
2 tbsp plus 2 tsp chia seeds
1 tsp maple syrup
1 tsp vanilla extract
1/8 tsp stevia (optional)

Mix all ingredients well (takes a bit to incorporate the cocoa powder, but be patient, it will).  Store in an air-tight container overnight.  And then enjoy!

This is not your ordinary pudding.  It has texture.  If you can get over that, it will be the best pudding you'll ever have.

The best part?  The whole thing is only 306 calories (according to sparkpeople.com) and after 5 bites, my chocolate craving was satisfied.


 p.s.  This is gluten free if your maple syrup and vanilla extract are.  

Saturday, January 4, 2014

Lemon Meringue Pie

As per request of our Dad for dessert after our big holiday meal, we made this lemon meringue pie.  It still needs some work (it's suggested to add cream of tarter to the meringue so it adheres to the pie and crust).  It was amazingly delicious, but our meringue slipped all over the place.

Lemon Meringue Pie


For the pie:

1 9-inch pie crust, baked as directed, cooled
2 2.9 oz boxes lemon flavor cook and serve pudding
1 c sugar
1/2 c lemon juice
zest of 2 lemons
4 egg yolks
4 c water
  1. Stir the pudding mix, sugar, water, lemon juice, lemon zest and egg yolks in sauce pan over medium heat.
  2. Bring to a full boil, stirring constantly.
  3. Cool completely, stirring twice (to remove film that is on top of pudding mix).
  4. Pour into pie crust.

For the meringue:

6 egg whites
2 tbsp corn starch
4 tbsp cold water
1 c boiling water
3/4 c sugar
2 tsp vanilla
pinch of salt
  1. Preheat oven to 350 degrees.
  2. Blend corn starch and cold water in sauce pan. 
  3. Add boiling water and then cook on medium heat until clear and thick, stirring constantly.
  4. Let stand until completely cold.
  5. With stand mixer, on high speed, beat egg whites until foamy.
  6. Gradually add sugar.
  7. Beat until stiff, but not dry.
  8. Turn to low speed and add vanilla and salt.
  9. Gradually beat in corn starch and water mixture.
  10. Turn stand mixer to high again and beat well.
  11. Spread meringue over pie.
  12. Bake for 10 minutes or until edges are golden brown.

Friday, January 3, 2014

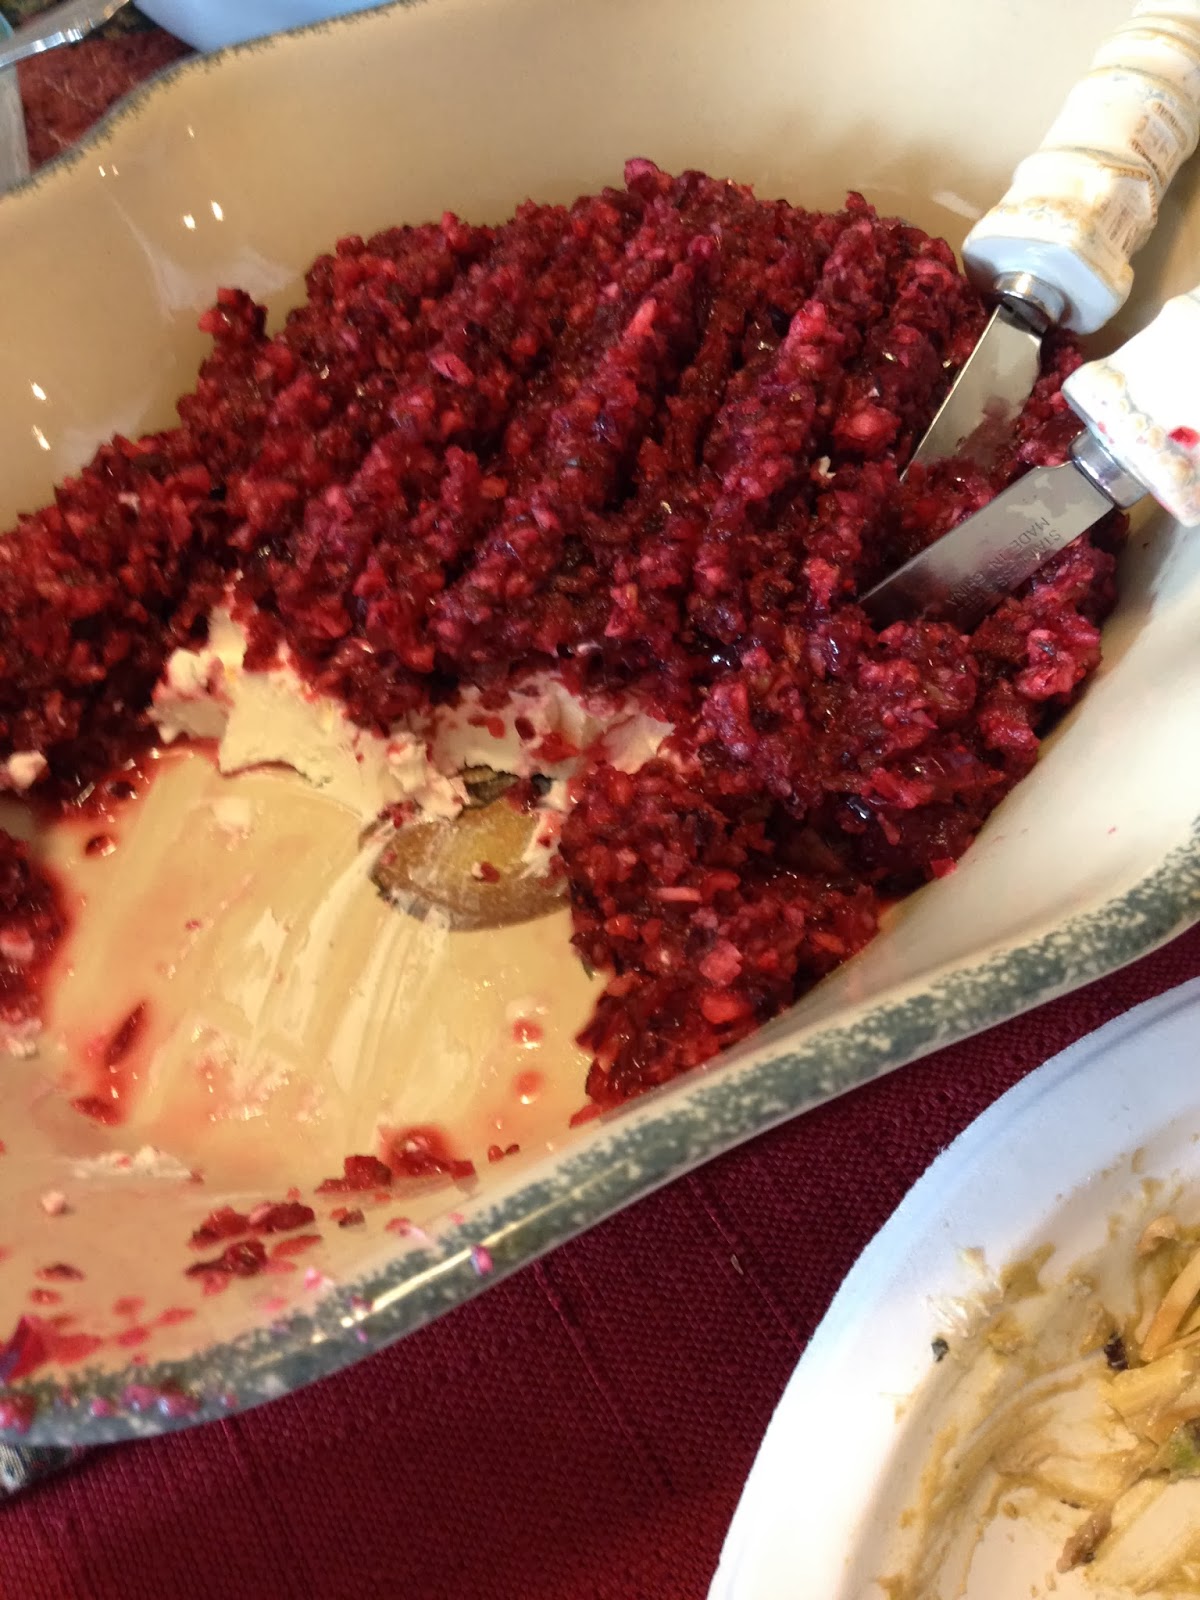
Festive Salsa

For our holiday feast, our mom suggested we add this appetizer to the already ginormous menu. And boy, are we glad she did. It's scrumptious!!

Festive Salsa

1 small bag cranberries
1 bunch green onions, root end removed, cut in half
1 jalepeno pepper, seeds and membrane removed
1/2 bunch cilantro (optional), we used parsley flakes (fresh parsley would have been better)
1/4 c sugar
1 8 oz cream cheese
Crackers for serving

Mix cranberries, green onion, pepper, cilantro or parsley, and sugar in food processor until well incorporated.

Store in refrigerator until ready to serve, best if overnight.

Pour over cream cheese and serve with crackers (wheat thins are our favorite)

p.s.  Mom got this recipe from her friend Cindy Shaw

Thursday, January 2, 2014

Divinity

This recipe  from our Grandma Lena has always scared me.  I knew I couldn't even attempt it until I had a stand mixer.  Well, I've had one of those for 10 years now, so must have been scured for other reasons!  Maybe it's the rumored humidity level that affects the candy "setting up" properly.  Or maybe it's because I just don't like to eat it.  But I've always wanted to try making it.  And it's our dad's favorite, so...

When our mom was here for the holidays, we decided to make it.  Knowing we had an "expert" to guide us through the otherwise lacking "recipe" made us willing cooks!!

And again, Travis saved the day!  Our individual candies weren't setting up right.  He found some really great directions on the internet that we'll include.  Praise!!

Divinity**

6 c sugar
2 c light corn syrup
1 c water

Mix well in a large stock pot and cook at a roiling boil until temperature reaches 250 degrees on a candy thermometer.  Stir constantly.

When the candy is almost to temperature, in a stand mixer,  beat 4 egg whites until stiff.  Add 2 tsp vanilla and 1/2 tsp salt.  Mix until well incorporated.

While the mixer is on medium speed, drip candy mixture into the egg mixture SLOWLY (the stream is about the size of a piece of string).  It is almost so slow you couldn't see the candy moving.

When this is done, beat on medium/high speed until the candy loses it's shine and turns a dull white.  We didn't mix long enough and our first attempts of dropping them didn't work...they just fell into puddles and didn't keep their fluffy shape.  It's important to mix until the color is not shiny anymore.

At this point, you can add 2 cups of chopped pecans...optional.

Drop by teaspoon onto wax paper (or, if you only have parchment paper, lightly grease it with butter or olive oil spray).  Store in tight container.

**this is the full recipe.  It's HUGE!  We recommend starting with a half recipe.


Tuesday, December 3, 2013

Best Roast EVER

I exaggerate a LOT.  But seriously, this is so good.  I told our friend, Paige, that I would post this for her.  But ALL of you need to try this!

Best Roast Ever


1 can Dr. Pepper (can use Coke or Pepsi, but NOT diet)
Roast (6-8 lbs) – Beef or Venison or Pork
3 tbsp Worcestershire sauce
2 tsp garlic powder
3 tsp dried basil
2 tsp onion powder
1 tbsp of minced garlic (I use garlic from the jar)
1 cup ketchup
1 more can Dr. Pepper on top
Optional Veggies:  potatoes, carrots, celery, onion.  Or without the veggies, you can make this into pulled pork style for sandwiches – whichever you choose.  We like it best with the veggies because of the sauce.  Yet, the "pulled pork" way is the so good left over.  I call it "pulled critter" since we mostly use elk or deer.  See?  Best ever. 
  1. In crock pot, add the ingredients in the order listed.
  2. If frozen roast, cook on high for 6-8 hours.
  3. If not frozen, cook on low for 3-4 hours (I think – I’ve never thawed one out to test it).
  4. The meat will be tender, well done, and the veggies will be soft.
  5. Remove meat from crock pot and slice.  Serve with sauce and veggies.  
  6. If using as pulled meat, remove meat from crock pot and shred.
  7. Put back in crock pot and add BBQ sauce of choice.  Cook on low for 30-60 minutes to warm the sauce and meat together.

Final Attempt At Homemade Salsa

We DID it!

From Travis today, unsolicited, "You know, I'm not much of a salsa fan and I LOVE this."  This is HUGE!  He said it was the perfect texture and the right amount of heat.  I'm the only one that likes it spicy, so I just add ghost pepper flakes to my portion when eating it.  For everyone else, this is IT!

Homemade Salsa


28 oz can whole tomatoes (we use San Marzano brand...good quality.  Hunts with no added salt is great, too)
2 Serrano peppers, cut off stem, cut in half (OR) 1 Serrano pepper and 10 slices jalapeno from a jar
1 fresh garlic clove
1 whole white onion, 4-5" in diameter, cut in fourths
Juice of one lime
1/2 tsp cumin
1/2 tsp chili powder
1/2 tsp sugar
1/2 tsp salt

Mix all in blender.  Serve with chips.

The big difference is the fresh garlic and the white onion (not yellow).  I'm so excited about this I can hardly stand it.

We decided to do a monthly cooking day with our friend, Sandy.  We are going to can this salsa.  Sorry stores.  I will never buy salsa again.

SOOOOOO GOOOOOD!!

Using the same photo.  It has always looked the same.

Monday, December 2, 2013

Caramels

This weekend, Nicole and I went to our friend, Sandy's house for candy making day.  We made 4 batches of caramels.  The best candy ever.  We never make them because they get eaten in one sitting.  And that can't be good for our health.  But hey.  We said we would share our recipes and mishaps.  We never claimed to be healthy all the time.  :0)

Caramels

2 c sugar
1 3/4 c dark corn syrup
1 c butter
2 c heavy whipping cream
Candy thermometer
  1. Grease a 9"x13" glass pan with butter.
  2. Mix all ingredients except 1 c of cream.
  3. Stirring constantly, over medium heat, bring mixture to a boil.
  4. Gradually add in the other cup of cream.
  5. Do not let mixture stop boiling!
  6. Cook to soft ball form (between 230-240 degrees), about 20-30 minutes.
  7. Pour mixture into glass pan.
  8. Let cool.
  9. Remove while slightly warm and cut into pieces.  
  10. Put each piece into wax paper.
  11. Store wrapped pieces in air tight container.


Suckers

One of the main reasons for this cookbook (besides a central place for our family recipes) is to share the lessons we have learned in the kitchen - so hopefully you all don't make the same mistakes we did.  And to remember them ourselves so we don't repeat them!

I tease Nicole and tell people that she really is the reason for the "mishaps" part of our cooking misadventures.  But, this may very well be the recipe that caused the very first cooking mishap on record:  December 2000 at my friend's house.  Our brother, Matt, and I, were having "holiday recipe sharing" day at our friend, Kim's house.  She had a small apartment (well, frankly, we all did at the time) and had these beautiful crocheted doilies on her dining room table and coffee table.  Her only rule was to NOT get them dirty.

My suckers were easy to do in the other room, out of the way of the others in the kitchen.  I boiled the mixture, put it in a candy storage container to pour it into the sucker molds I had laid out on a cookie sheet...on the doilies.  Well, of course, boiling candy does not do well in plastic.  The bottom melted through and in my genius glory, I put my hand out to catch the candy to prevent a mess.  If I had just let it go, it would have just spilled onto the cookie sheet...mess free.

Instead, I burn my right hand and drag sucker mess from the living room to the kitchen to put my hand under cold water.  Unless that carpet has been replaced since, there is still sucker in it.  Of that I am sure.

Candy surprisingly comes off your skin easily.  And it hurt to keep it in the water.  My soft-spoken friend, Lori, had just been trained in first-aid and CPR and knew to keep it there for as long as possible to stop the burning from continuing.  She was not nice about it either.  And for that I am now grateful.  I kept it under the freezing cold water for over an hour.  I'm sure that's what saved my hand.

Our other friends left to go to the hospital...a family member was there.  I declined a ride to get it checked out, because what would they say?  "You burned your hand, now that will be $50."  No thanks.  The visit to the hospital took longer than planned, so we all ended up over there.  A doctor did look at my hand and gave some free advice.  NOT to pop the blister - and a blister I had.  The size of a soft ball in my hand.  So of course, we popped it.  My dad, husband, and Doctor-To-Be brother all said it was necessary.

Enter blood poisoning.  And a tetanus shot.  And an anti-biotic shot.  Both hurt worse than the burn.  By this time all the nerves were damaged.  I had 3rd degree burns on my hand and 2nd on my fingers.  After physical therapy (which I lovingly called my "cry appointment") three times a week, my hand is good as new.  I can still do an octave on the piano, too!

So, let this be a lesson.  Don't put this into anything plastic.  That might be common sense to all of you, but my young self didn't think of it.  Now, we use Pyrex glass measuring cups with the handle far on the side to pour the mixture into the molds.  And they are DELICIOUS.  Worth every minute!

Suckers


3 3/4 c sugar
1 1/2 c light corn syrup
1 c water
1 tsp food coloring
1 tbsp flavor extract or 1 dram of flavor oil (Wild Cherry is our favorite)
Candy thermometer
Sucker molds
Sucker sticks

Recipe makes about 42 suckers approximately 1 inch in diameter.
  1. Arrange molds and sticks onto greased cookie sheet.
  2. In a quart sauce pan, stir CONSTANTLY the sugar, corn syrup and water over medium heat until boiling.  Seriously, don't stop stirring.
  3. Boil over medium heat without stirring until temperature reaches hard crack (about 310 degrees).  Watch over this carefully.  This goes from perfect to burnt in about 2 seconds.
At this point, you'll need to know what to do and plan for it.  You have to MOVE FAST!  This sets up really quick.  So get ready:
  1. Remove from heat.
  2. Add flavoring and color.  Stir well.
  3. Pour into 2 glass Pyrex measuring cups (We use the 2 cup with large side handle so as not to burn ourselves!)
  4. Pour mixture into molds, filling to top of mold.
  5. Let set until at room temperature.
  6. Store in air-tight container or zip top bags.


You need one of these per recipe.


Saturday, November 30, 2013

Orange-Glazed Steaks

This is one of the greatest recipes we know.  We got it off the internet YEARS ago.  We always use whatever critter our husbands have in the freezer.  Beef, deer, elk, whatever you have will work.

Orange-Glazed Steaks

2/3 c dry red wine (we usually use merlot)
1/2 c fresh orange juice
1/3 c fresh lime juice
1/2 c honey
1/4 c cider vinegar
1/4 c soy sauce
2 tbsp olive oil
1 1/2 tsp minced garlic (we use the kind in the jar)
1 tsp finely grated orange zest
1 tsp Tabasco sauce
1/2 tsp ground cumin
1/2 tsp dried thyme
1/4 tsp ground black pepper
4-6 lbs steaks
  1. Lay steaks in a shallow glass baking dish.
  2. Mix all marinade ingredients well in a separate bowl, until honey is dissolved.
  3. Pour marinade over steaks.
  4. Cover and marinade overnight.
  5. Bring the steaks to room temperature.
  6. Remove steaks from marinade and cook to desired temperature (we usually grill them on the BBQ, but broiling them would work, too).
  7. Place the marinade in a large skillet and bring to a boil over high heat.
  8. Continue to boil until the liquid is syrupy and mahogany-colored.  Remove from heat.  There should be about a cup of glaze.
  9. While cooking the steaks, brush the glaze on both sides of the steaks.
  10. You can use remaining glaze for sauce when serving.


p.s.  We have made this dish a LOT and we can never get the glaze to thicken.  These steaks are amazing without adding any glaze upon cooking or serving.  We keep trying the glaze just for principle now.  LOL

p.p.s.  UPDATE 12/3/13:  After making this dish most recently, we have mastered the glaze! 
  1. Using a large stock pot, bring glaze to a boil.
  2. Turn heat to medium and cook, uncovered for 2 hours for a thick glaze.  For a thinner sauce, 1 hour and 45 minutes.
  3. Stir occasionally.
  4. This taught us the lesson "LOW AND SLOW".


Noodles and Butterballs

This soup.  It is requested for special birthday dinners.  It can be found at nearly every Jones' gathering.  It's a traditional German recipe.  We know it from Travis's Grandma Emma Jones.  When talking to Travis & Steve, they both said "She got it from here mother".  Wherever it came from, let me just tell you.  If you don't like soup - you will after trying this.  Won't ya, Nicole?

Noodles and Butterballs

1 package frozen egg noodles (24 oz)
1 whole chicken, thawed, rinsed
Salt & Pepper, to taste
2 cans chicken broth
Chicken base, to taste
1 cube  (1/2 c) butter
1 c milk or 1/2 cup evaporated milk (plus more if mix is too dry)
2 eggs
1 can plain bread crumbs (15 oz)
Allspice to season (Allspice substitute recipe to follow)
[Carrots, Celery, Yellow Onion all diced.  Optional.  The original doesn't have all of these veggies - but we prefer it].
  1. Place the whole chicken in a large stock pot.  
  2. Cover with water.
  3. Add salt and pepper to taste.
  4. Boil until chicken falls off the bone, it took us 3 hours.  While we were making this, we asked both Travis and Steve how long this takes for the chicken to be done.  They BOTH said, "Until the chicken falls off the bone."  And it really does ... in the water ... fall off the bone. 
  5. Remove chicken from pot and let cool.
  6. Leave broth in pot.
  7. Skim fat from top of the broth.
  8. Carve chicken into bite sized pieces.  Discard bones and skin.  Keep meat in a bowl and set aside.
  9. Make the butterballs:
    1. Melt butter.
    2. Mix butter, milk, eggs, breadcrumbs, and a generous amount of allspice.  We use 2 tbsp.  This is best done with your hands.
    3. Roll batter into 1" sized butterballs.
  10. Make soup:
    1. Bring broth to a boil.
    2. Add 2 cans of chicken broth and chicken base.
    3. Add vegetables and cook until they are tender.
    4. Add chicken.
    5. Then add frozen noodles and butterballs.
    6. Cook all ingredients together until "I don't know, until the noodles are soft."  By this time, we're seeing a trend.  Steve & Travis are just going to answer the same.  LOL  Anyway, the noodles get soft and float to the top.  It took us about 30 minutes.
  11. Stand back and watch it disappear.

Photo courtesy of Aunt Charlene Bartlome
Photo courtesy of Travis Jones

 Allspice substitute

1/2 tsp ground cinnamon
1/4 tsp ground ginger
1/4 tsp ground cloves

Mix well.  Yield 1 tsp.

Wednesday, November 27, 2013

Thanksgiving Feast - Dessert - Cherry Pie

Most of the recipes we've posted to this point haven't been shared, or tested, by anyone else.  But this recipe has.  Our friend Paige heard about this "mishap" and said she'd been looking for a good cherry pie recipe. And she's made it several times since!

This recipe was the reason for the "Read the recipe all the way through" lesson.  Two years ago, we were very ambitious with about 15 recipes for the meal.  We decided to do this one first so it could it could bake while we prepared other dishes (and we needed to use the oven in "shifts" to get the timing right for everything to be done at once).

First 10 minutes of the big day and Nicole dumps the whole can of cherries into the prepared pie crust.  Without draining it.  "But without the liquid from the can, how does it get so juicy?"  Baking is magical, Nicole.  It just does.

Cherry Pie

1 1/3 c sugar
1/3 c flour
2 cans pitted, red tart cherries, DRAINED
1/4 tsp almond extract
2 tbsp butter
2 Pillsbury Pie Crusts (there are 2 to one box usually)
Red food coloring, optional

  1. Preheat oven to 425 degrees.
  2. Lay out one of the pie crusts into 9" pie pan, and press to form to the pan.  Set aside.
  3. In a separate bowl, stir together sugar and flour.
  4. Mix with cherries. 
  5. Add a couple of drops of red food coloring, if desired.
  6. Pour into pie crust.
  7. Sprinkle with almond extract.
  8. Pat with butter (evenly spaced)
  9. Cover with second pie crust.
  10. Seal and flute.
  11. Add several slits in top of crust.
  12. Cover edge of pie with 2-3 inch thick strips of aluminum so edges won't burn.
  13. Bake for 25-30 minutes.
  14. Remove foil.
  15. Bake for 10-15 minutes longer until crust is brown and juice begins to bubble through the slits.
Tip:  Put large cookie sheet on the shelf under the pie.  Just in case it bubbles over so your oven isn't a mess.  

We serve warm with vanilla ice cream.

What NOT to do.  LOL
YUM!


Tuesday, November 26, 2013

Attempt #214 At Homemade Salsa

I don't like candy.  I'm not a big dessert eater...if I do eat dessert, it's just a couple of bites.  But chips and dip?  Chips and salsa?  Goodness, I could eat my weight in it.  So, I'm always on a quest to find the best salsa and then make it.

My sister-in-law, Maria's mother makes the best salsa I have ever had.  I have the recipe and it turns out okay...but it's nowhere close to hers.

I tried my own from the internet and it turned out to be spaghetti sauce. HAHA

Now this year, the goal is to recreate Chili's salsa, as per our Dad's request.  He may be stopping on his way here and buying some.

This is the original recipe I found on Pinterest:

1 large can (29oz) whole tomatoes, drained
1 small can whole or sliced jalapeños (not pickled) less if you want less spice
1/2 of a small onion
1 tsp garlic salt
1/2 tsp salt
1/2 tsp sugar
1 tsp lime juice

Mix all in blender.  Serve with chips.

Here's what I did, based on what I had in the pantry, and what I did to try and "fix it":

Salsa  


28 oz can whole tomatoes
2 Serrano peppers
3 tsp garlic, minced
1 whole yellow onion, 4" in diameter
juice of one lime
1/2 tsp cumin
1/2 tsp chili powder
1/2 tsp sugar
1/2 tsp salt

Mix all in blender.  Serve with chips.

HELP


The texture was PERFECT.  I couldn't ask for a better texture.  But with the first bite, all I taste is tomato sauce.  It's the second chew that has the good flavor and a little bit of heat.  

How do I get that first bite to have flavor?

I spooned some out and tried vinegar, black pepper, more lime juice.  Nothing helped...it just made the salsa taste like vinegar, pepper and lime.  

Thoughts:
  1. I used minced garlic from a jar.  Does fresh garlic really make that much difference?  And the recipes I found only used garlic salt.
  2. I used fresh peppers, not canned.
  3. I used a yellow onion.  Should I have used a white onion?
  4. I thought letting it refrigerate overnight would help.  It still tastes good, bites 2-4, but that first bite is just tomato sauce.
So all you salsa makers out there.  Please weigh in.  Comment below, on Facebook or Pinterest.

Thanks in advance!!

See?  Just look that awesome texture!

Sunday, November 24, 2013

Thanksgiving Feast - Dinner - Big Ass Bowl Dressing

Dressing or Stuffing?  Age old debate.  And even over what each means.  In my immediate family, dressing is done in a separate dish.  Stuffing is done on the inside of the turkey.  Mostly same ingredients, just different technique.

This dressing recipe was originally called "Sage Dressing" and comes from my Grandma Alice, on my mom's side.  It is AMAZING.

It was renamed after we tried to make this dressing without the "big ass bowl" that our parents have. This bowl lived under the stairs and was used for popcorn balls and this dressing recipe.  It was called the "silver bowl" back then.  When we ventured out on our own with this meal, our parents brought their bowl for us to use.  You can see what we are talking about here.  Ours is a little smaller, but the visual might help.  Then one year, they weren't here and we tried to make this in two separate smaller bowls.  It was the biggest mess.  And we said, "Sure wish we had that big ass bowl right now".  We now BOTH own a big ass bowl.  When I got mine, Travis, my sweetie, said, "What on earth are going to do with this the other 364 days of the year?"  And you'll never guess who uses it for butchering deer and elk?  Hmmm.  What will we do with it?

Big Ass Bowl Dressing

7 loaves of white or wheat bread
6-8 c turkey broth, canned or homemade (recipe to follow)
1 cube butter (1/2 c)
1 onion, chopped (easiest to chop in the food processor)
3-4 celery stalks, chopped (easiest to chop in the food processor)
3/4 c water
8 eggs
To your taste (amounts we used):
Parsley Flakes (3 Tbsp)
Black Pepper (1 Tbsp)
Rubbed Sage (1 Tbsp)
Ground Sage (6 Tbsp)
Poultry Seasoning (4 Tbsp)
  1. Preheat oven to 350 degrees.
  2. In big ass bowl, break bread into bite sized pieces.
  3. In a microwave safe bowl, combine chopped onion, celery, butter and water. 
  4. Microwave covered 4-6 minutes until butter is melted and the celery and onion are soft.
  5. Pour mixture over bread.
  6. In a separate bowl, whisk eggs together.  Add spices.  Mix well.
  7. Pour this mixture over the bread.
  8. Pour turkey broth over bread.
  9. Mix all well until bread is soft and all ingredients are well incorporated.
  10. If dry, can add more broth.
  11. Put in large baking dish (we use this 9"x13" baker from Pampered Chef) and bake for 1 hour until top is crispy.

Turkey Stock

Turkey neck and items from turkey bag when removed from packaged turkey.
2 white or yellow onions, cut into quarters
26 whole cloves, pressed into onion pieces
3 bay leaves
4 celery stalks, cut in half
6 cloves garlic
add water and/or chicken broth until large sauce pan is 3/4 full
1 tbsp salt
1 tbsp pepper
add season salt and paprika to taste
  1. Rinse turkey pieces.
  2. Place in large sauce pan.
  3. Add remaining ingredients.
  4. Simmer in large sauce pan, covered, on med-high heat for 2 hours.
  5. Strain out large items and save stock.


Saturday, November 23, 2013

Thanksgiving Feast - Dinner - Yams

Yams

1-28 oz can yams in light syrup
small dots of butter
2-3 tbsp brown sugar
2 c mini-marshmallows
  1. Preheat oven to 350 degrees.
  2. Place yams in small, but deep, baking dish.
  3. Add small dots of butter evenly on top.
  4. Sprinkle evenly with brown sugar.
  5. Sprinkle evenly with marshmallows.
  6. Bake at 350 degrees for about 30 minutes until heated through and the marshmallows are golden brown.

p.s.  This is the easiest recipe ever,  It takes no thought and sometimes you just need one of those kind during a meal of this caliber. We hope to revamp it someday into something more healthy.