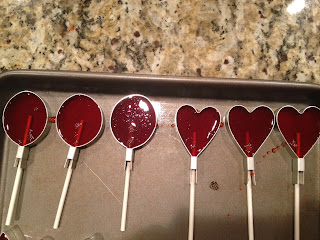
I tease Nicole and tell people that she really is the reason for the "mishaps" part of our cooking misadventures. But, this may very well be the recipe that caused the very first cooking mishap on record: December 2000 at my friend's house. Our brother, Matt, and I, were having "holiday recipe sharing" day at our friend, Kim's house. She had a small apartment (well, frankly, we all did at the time) and had these beautiful crocheted doilies on her dining room table and coffee table. Her only rule was to NOT get them dirty.
My suckers were easy to do in the other room, out of the way of the others in the kitchen. I boiled the mixture, put it in a candy storage container to pour it into the sucker molds I had laid out on a cookie sheet...on the doilies. Well, of course, boiling candy does not do well in plastic. The bottom melted through and in my genius glory, I put my hand out to catch the candy to prevent a mess. If I had just let it go, it would have just spilled onto the cookie sheet...mess free.
Instead, I burn my right hand and drag sucker mess from the living room to the kitchen to put my hand under cold water. Unless that carpet has been replaced since, there is still sucker in it. Of that I am sure.
Candy surprisingly comes off your skin easily. And it hurt to keep it in the water. My soft-spoken friend, Lori, had just been trained in first-aid and CPR and knew to keep it there for as long as possible to stop the burning from continuing. She was not nice about it either. And for that I am now grateful. I kept it under the freezing cold water for over an hour. I'm sure that's what saved my hand.
Our other friends left to go to the hospital...a family member was there. I declined a ride to get it checked out, because what would they say? "You burned your hand, now that will be $50." No thanks. The visit to the hospital took longer than planned, so we all ended up over there. A doctor did look at my hand and gave some free advice. NOT to pop the blister - and a blister I had. The size of a soft ball in my hand. So of course, we popped it. My dad, husband, and Doctor-To-Be brother all said it was necessary.
Enter blood poisoning. And a tetanus shot. And an anti-biotic shot. Both hurt worse than the burn. By this time all the nerves were damaged. I had 3rd degree burns on my hand and 2nd on my fingers. After physical therapy (which I lovingly called my "cry appointment") three times a week, my hand is good as new. I can still do an octave on the piano, too!
So, let this be a lesson. Don't put this into anything plastic. That might be common sense to all of you, but my young self didn't think of it. Now, we use Pyrex glass measuring cups with the handle far on the side to pour the mixture into the molds. And they are DELICIOUS. Worth every minute!
Suckers
3 3/4 c sugar
1 1/2 c light corn syrup
1 c water
1 tsp food coloring
1 tbsp flavor extract or 1 dram of flavor oil (Wild Cherry is our favorite)
Candy thermometer
Sucker molds
Sucker sticks
Recipe makes about 42 suckers approximately 1 inch in diameter.
- Arrange molds and sticks onto greased cookie sheet.
- In a quart sauce pan, stir CONSTANTLY the sugar, corn syrup and water over medium heat until boiling. Seriously, don't stop stirring.
- Boil over medium heat without stirring until temperature reaches hard crack (about 310 degrees). Watch over this carefully. This goes from perfect to burnt in about 2 seconds.
- Remove from heat.
- Add flavoring and color. Stir well.
- Pour into 2 glass Pyrex measuring cups (We use the 2 cup with large side handle so as not to burn ourselves!)
- Pour mixture into molds, filling to top of mold.
- Let set until at room temperature.
- Store in air-tight container or zip top bags.
 |
| You need one of these per recipe. |


No comments:
Post a Comment